“`html
What Planer Snipe Actually Is (And Why It Happens)
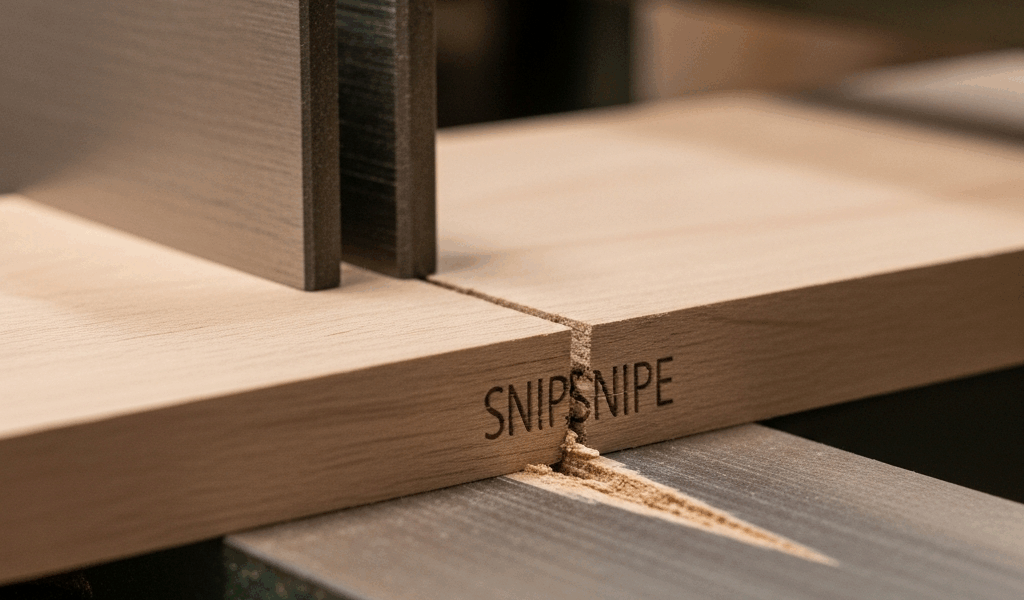
Planer snipe has gotten complicated with all the misinformation flying around about it. That divot or gouged edge at the nose and tail of a board after it runs through a thickness planer—yeah, that’s snipe. As someone who’s spent years dealing with this particular headache in my workshop, I learned everything there is to know about wood planers and their quirks. It’s one of the most common complaints I hear from other woodworkers, right up there with dust collection and hand plane maintenance.
The snipe looks like a shallow depression, maybe 1/16″ to 1/8″ deep, running the width of the board. Sometimes barely visible. Other times deep enough to ruin a finished edge or eat into your working dimensions. Probably should have opened with this section, honestly—understanding why it happens makes the fixes actually make sense instead of feeling like random troubleshooting.
Here’s what’s actually happening mechanically. A board enters a thickness planer, supported by the infeed roller. It travels under the cutterhead while infeed and outfeed rollers keep it pressed down. But there’s a critical gap—that microsecond between when the trailing end leaves the infeed roller and when the outfeed roller grabs it. The board’s nose and tail aren’t being held down with the same pressure they were during the middle of the cut. The cutterhead is still spinning. The board dips slightly. The cutter takes a deeper bite at that exact moment.
Uneven support during the transition between infeed and outfeed zones causes a board to naturally lift away from the cutterhead when pressure isn’t balanced on both sides. That’s not a defect in your planer—it’s physics. But it’s fixable.
Infeed and Outfeed Table Alignment Check
The first and most critical diagnostic: your infeed and outfeed tables need to be perfectly coplanar with the cutterhead. Coplanar means they’re on the same plane, level with each other, and aligned so the board doesn’t dip between them.
Here’s how to check this properly. Disconnect power to your planer first—flip the breaker, remove the key if you have one. I learned this lesson the hard way after nearly catching my hand checking alignment with the machine powered on.
Use a straightedge. A 24″ or 36″ metal ruler works fine, or grab a proper machinist’s straightedge if you have one. Lay it across the infeed table, over the cutterhead gap, and onto the outfeed table. Look for light gaps underneath. Even a slight gap in the middle means your tables aren’t coplanar. That gap is directly causing snipe.
Most thickness planers have adjustment bolts on the outfeed table—usually located underneath or on the sides. You’re looking for a series of hex bolts, typically four corners, sometimes six points of contact. A 3/8″ wrench or socket usually fits these. Start by adjusting them 1/8 turn at a time, checking with your straightedge between adjustments. Too aggressive and you’ll over-correct.
The infeed table is usually factory-set and not adjustable on most home and mid-range planers. If your infeed table is misaligned, you’re looking at shim placement or bearing adjustment—which is beyond field repair on most machines. Most snipe problems come from outfeed table drift, not infeed.
Once you’ve got them coplanar, lock those adjustment bolts down and check again. This single fix resolves snipe in probably 40% of cases I’ve dealt with.
Adjust Pressure Roller Tension and Height
The infeed pressure roller is that spring-loaded component pushing down on the top of the board as it enters the planer. Too loose and the board lifts at the tail end—bingo, snipe. Too tight and you get tearout, crushed wood fibers, and rough surface finish.
Finding the right pressure is about balance. Most manual thickness planers have an adjustment knob or lever on the infeed pressure roller assembly, usually located on one or both sides of the machine. On my old DeWalt DW735, it’s a T-handle knob on each side. On Ridgid or Jet machines, it might be a lever. Check your manual for the exact location.
Loosen the adjustment about half a turn. Run a test board through at your target thickness—something like a poplar offcut, 1″ thick, about 12″ long. If snipe appears at the trailing end, tighten the infeed pressure roller another quarter turn and test again. Document what works. You’re looking for the point where snipe disappears but the surface stays smooth without tearout marks.
Don’t over-tighten. I’ve seen people crank down on these until the springs are nearly solid. That creates crushing force damaging wood and can actually make snipe worse because the board gets deformed before it hits the cutterhead. The pressure should be firm enough to hold the board flat, not punitive.
Height matters too. If the pressure roller is set too high, it might not be making consistent contact with the board, especially with thinner stock. Too low and it digs in. Most planers have adjustment screws—typically small Phillips or hex head bolts on the mounting bracket. Raise or lower both sides equally. The roller should just barely kiss the board when the planer is set to your desired thickness.
Use Featherboards and Support Techniques
Sometimes the mechanical setup is fine, but you’re running especially difficult material or working with short, thin boards where snipe is inevitable. Featherboards and outfeed support tables earn their keep here.
A featherboard is a board with thin parallel “fingers” cut into one end—think of it like a wooden comb. You clamp it to the table so those fingers press lightly against your workpiece as it feeds through the planer. The fingers follow the board, maintaining downward pressure right through the transition zone where snipe happens. Harbor Freight sells basic featherboards for around $15. DeWalt makes better ones for $30–$40. Or build one from a piece of poplar and a table saw—two hours of work, basically nothing in cost.
Featherboards work especially well for boards longer than 24″ and thicker than 3/4″. Position it on the infeed side, angled so the fingers slope toward the outfeed. Tighten it down with a C-clamp, but don’t crush the board.
For boards shorter than 18″ or thinner than 1/2″, an outfeed support table is your real weapon—a flat, level work surface bolted or clamped to the outfeed side of your planer, set perfectly coplanar with the outfeed table. Run the board through, and as its trailing end comes off the planer’s outfeed table, it immediately lands on your support table, preventing the dip. A sheet of 3/4″ MDF, 24″ × 36″, on adjustable legs works perfectly. Cost me about $40 in hardware and materials.
Backing boards—solid lumber clamped behind your workpiece as it feeds through—prevent snipe on the trailing end because the planer can’t lift the board when there’s solid wood behind it. Use this for figured wood or premium material. The backing board absorbs the snipe instead of your good wood. Sound wasteful? It’s not. You’re protecting $200 of walnut by sacrificing $3 of pine.
Quick Fixes for Snipe You Already Have
Sometimes you finish planing and snipe is already there, staring at you from the end grain. You’ve got options that don’t involve starting over.
For shallow snipe (under 1/32″), hand plane it out. A #5 jack plane or a sharp #4 smoothing plane removes the snipe in two or three passes without removing much material—takes 30 seconds. This is my first instinct because it preserves the board’s dimensions and you maintain full control.
For deeper snipe, angle your planer to plane the board at a slight taper, so the snipe runs into the waste. Set the outfeed table slightly lower than normal (1/32″ to 1/16″) so the second pass catches that sniped area. One more pass and it’s gone. You lose a tiny bit of thickness, but less than you’d lose scrapping the board.
Accept a slight chamfer at the end if snipe is severe. A hand plane or chamfer bit on a router turns the problem into a design feature. Sounds like compromise, but professionally finished work often has chamfered edges anyway. Make it intentional instead of accidental.
If the board is thick enough and snipe is isolated to just the nose or tail, cut that end off and save the good part. Measure before you plane—if you’re planning a 36″ finished board and you get snipe, you might plane it to 34.5″ and call it solved.
The real lesson here: snipe isn’t a planer failure. It’s a setup problem with real solutions. Fix your table alignment, dial in your pressure roller, and use support techniques for tricky boards. That $400 planer will work like a $2000 machine.
“`


Stay in the loop
Get the latest the workshop journal updates delivered to your inbox.