How to Tell If Your Router Table Fence Is Actually Out of Square
Router table alignment has gotten messy with all the conflicting advice flying around. Square the fence to the bit. No, square it to the table. Check the plate first. Everyone’s got a method, and half of them skip the step that actually matters.
As someone who ruined a embarrassing number of oak rail-and-stile sets before figuring this out, I picked up the practical knowledge of diagnosing a fence that’s gone wrong. Today, I will share it all with you.
But what is a “fence out of square”? In essence, it’s any condition where your fence face isn’t perfectly perpendicular to the table surface. But it’s much more than that — it also includes fences that drift along the table length, split-fence halves that don’t sit in the same plane, and plates that introduce their own tilt before the fence even enters the picture.
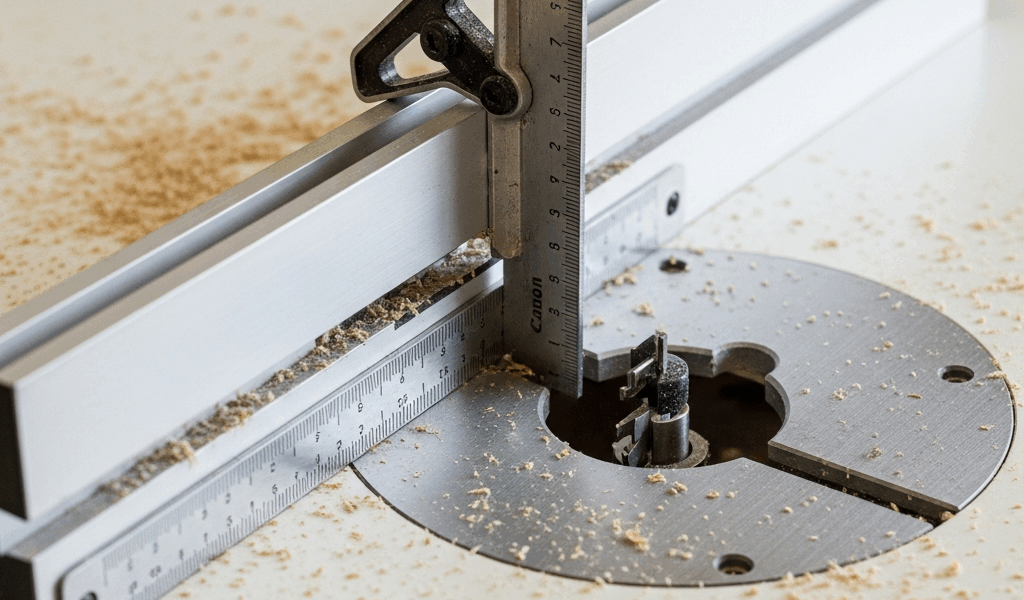
Start with a good square. I use a 12-inch Starrett machinist’s square — runs about $35 at most woodworking suppliers and it won’t lie to you. Place the blade flat against the fence face, stock resting on the table. You’re looking for a uniform gap along the entire contact length. If that gap widens toward the top of the fence, the fence is tilting away from the table. If it widens toward the bottom, it’s leaning in. Either way, you’ve got a fence that’s tilted off perpendicular.
Now test the fence against the bit. Raise the bit so it protrudes about 1/8 inch above the table surface. Place the square against the bit, then check that against the fence face. A bent or badly seated fence will show a clear deviation here — usually more obvious than you’d expect.
Here’s the part most woodworkers skip entirely. Check whether the problem lives in how the fence halves sit relative to each other. If you have a split fence — separate infeed and outfeed sections — press a straightedge across both faces simultaneously. They should be perfectly coplanar. One half sitting proud by even 1/32 inch means your fence isn’t actually square to the table, even if each individual half checks out perfectly on its own.
The symptom showing up in your workpiece will tell you which problem you’re dealing with. Tearout on only one edge of a rabbet points to a tilted fence. A consistent stepped edge on both sides of a profile cut means a drifting fence — one that’s wandered along the table length rather than holding perpendicular. An inconsistent cut from left to right suggests split-fence halves that aren’t coplanar. That’s what makes reading your scrap pieces so valuable to us woodworkers — the wood tells you exactly what went wrong if you know how to listen.
Check the Table Before You Touch the Fence
Quick callout up front. I’ve lost a full hour adjusting a fence that was absolutely fine, only to eventually realize the table itself was the actual culprit the whole time.
A straightedge is your best tool here — a 24-inch aluminum straightedge, or even a long level with the bubble ignored. Lay it diagonally across the table surface and look for light gaps underneath. Run it in two directions: lengthwise and crosswise. MDF tops especially will cup or bow over time, particularly if your shop gets humid or you’ve got a window nearby. Aluminum tables can flex too, especially under a large router with significant side-loading forces working against it.
Run your hand across the surface as well. You’ll feel dips your eye will completely miss. Cast iron tops are usually bulletproof — but check them anyway. Shipping damage happens, and it happens quietly.
The router plate itself is equally critical. It should sit perfectly flush with the table, not proud, not recessed. If the plate protrudes even 0.015 inch, your fence reference point is already wrong before you’ve touched a single adjustment bolt. If it’s recessed, the fence can develop a slight rock on the table edge that throws everything off.
I discovered this the hard way on a Bosch 1617EVSPK mounted in a Jessem Mast-R-Lift. The lift’s leveling screws had loosened over maybe six months of use, dropping the plate roughly 1/16 inch on one side. Every fence adjustment looked dead-on against the table surface, but the bit was effectively sitting lower on one side than the other. The cuts reflected that inconsistency in absolutely maddening ways. Side-step the error I made.
Check the fasteners holding the plate down. Pull them out, clean any packed sawdust out of the threads and the holes, then reinstall them tightening in a cross pattern — same principle as seating a wheel on a car. Uniform pressure all the way around.
How to Adjust a Router Table Fence That’s Out of Square
Once you’ve confirmed the table and plate are flat and flush, adjusting the fence is actually pretty straightforward. The specific approach changes slightly depending on your fence design, though. So, without further ado, let’s dive in.
For T-track mounted fences — the most common type you’ll encounter — you’re working with adjustment bolts that tilt or slide the fence along the track. There’s usually a main clamp bolt holding the fence tight and one or two micro-adjustment bolts on each end. Loosen the main clamp just enough that you can move the fence deliberately by hand. Not so much that it swings freely on its own.
Place your Starrett square against the fence face. At one end, loosen the micro-adjustment bolt slightly and tap the fence with a plastic mallet — not a hammer, a plastic mallet — until the square shows perpendicular alignment. Snug that bolt down. Move to the opposite end, repeat the process. Then retighten the main clamp in small increments, checking your square every quarter-turn to confirm the fence isn’t drifting as the clamp seats.
That last step is critical and most people skip it entirely. Tightening the main clamp can pull the fence out of square if the bolts on one side seat before the others. Go slow. Alternate between sides. It takes maybe three extra minutes and saves you from starting over.
For freestanding fences with lever clamp locks, the principle is identical but the execution differs. You’ll loosen the clamping pressure slightly, move the fence body by hand or with shims, then re-clamp. Plastic shims — the kind roofers use, available at any big-box store for about $4 a bag — wedged between the fence base and the table let you fine-tune position without moving the whole fence across the table.
Once it’s square, test it again. Place the square at three different heights along the fence face. All three should show the same alignment. If the top checks out but the middle doesn’t, the fence face itself may be bowed — which is a different problem entirely.
Fixing a Split Fence With Misaligned Faces
Split fences are more complex. You’re managing two separate halves, each needing to be independently square to the table — but also coplanar with each other across the bit opening. That’s what makes split fences endearing to us router table users while simultaneously being the source of so much quiet frustration.
First, square each half individually using the process above. Then press a straightedge firmly across both halves where they meet at the bit opening. Any step between them means one side is proud or recessed relative to the table surface.
Most split fences allow independent vertical adjustment on each side via shims under the mounting brackets or threaded leveling screws. Adjust the proud side down, or bring the recessed side up, until both halves sit in the same plane. Check it with the straightedge after each small adjustment.
One note worth mentioning: if you’re planning a jointing operation, you’d intentionally offset the outfeed fence slightly forward — proud by about 1/32 inch — to support the newly cut edge. That’s intentional and correct. For standard profile work, though, they should be perfectly flush. Don’t accidentally shim in a jointing offset and then wonder why your profiles are coming out with a slight taper.
Why Your Fence Keeps Going Out of Square After You Fix It
You square it up perfectly. You make a perfect cut. Next session, it’s drifted out again. This is genuinely maddening — and it usually points to one of four specific problems. I’m apparently someone who has personally experienced all four, and addressing them one at a time finally worked for me while just re-squaring the fence every session never actually solved anything.
First: worn T-track slots. If your fence bolts rattle even slightly when clamped, the T-nuts are probably loose in the track. Pull the fence off, remove the T-nuts, replace them — they’re under $3 each at most hardware suppliers. Or machine a thin aluminum or brass shim to take up the slack. Either approach eliminates the slop that lets the fence walk.
Second: a cracked or warped fence body. A fence that’s taken a few impacts develops internal stresses that cause it to shift slightly under clamping pressure. This one is honest: buy a new fence. Depending on the style, you’re looking at $60 to $200 — money well spent compared to ruining another $40 board.
Third: loose handles or adjustment bolts. Vibration loosens hardware over time. Before each use, manually check every bolt and handle on the fence system. I keep a 4mm and a 5mm Allen wrench in a small pouch clipped directly to my fence — takes maybe 90 seconds to check everything before starting a session.
Fourth: insufficient clamp pressure. Some fences use friction-based clamps that gradually slip under sustained vibration. A mechanical clamp or a secondary clamp point solves this completely. That fix sorted out an older Incra fence I owned that kept drifting mid-session during heavier profile cuts. That was 2019. Haven’t had the problem since.
If you’ve addressed all four and the fence still won’t hold square, circle back to the table surface and the router plate. One of those two things has probably shifted since you last checked them. The fence is almost never the only variable.


Stay in the loop
Get the latest the workshop journal updates delivered to your inbox.