What Band Saw Drift Actually Is
Band saw drift has gotten less clear-cut with all the conflicting advice flying around. Everyone blames the fence. Almost nobody looks at the blade itself — at least not first.
But what is drift? In essence, it’s when your blade cuts at an angle instead of straight, even though your fence is perfectly square to the table. You push a board through, expecting a clean parallel cut, and the thing just wanders left or right on its own. It’s maddening. But it’s much more than a simple alignment issue.
Here’s what I wish someone had told me earlier: drift is not always your fault. I spent two years blaming my technique before discovering my blade tension was still sitting at the factory default — basically useless for precision work. The blade condition, the tension setting, and your saw’s overall alignment can all cause drift independently. A worn blade is the culprit most people miss entirely, chalking everything up to fence problems when the real issue is tooth wear or uneven set. Avoid the path I took.
The Most Common Causes of Blade Drift
Three things cause band saw blade drift. Get familiar with all three — you’ll need to rule them out in order, or you’ll be chasing ghosts.
Uneven Tooth Set
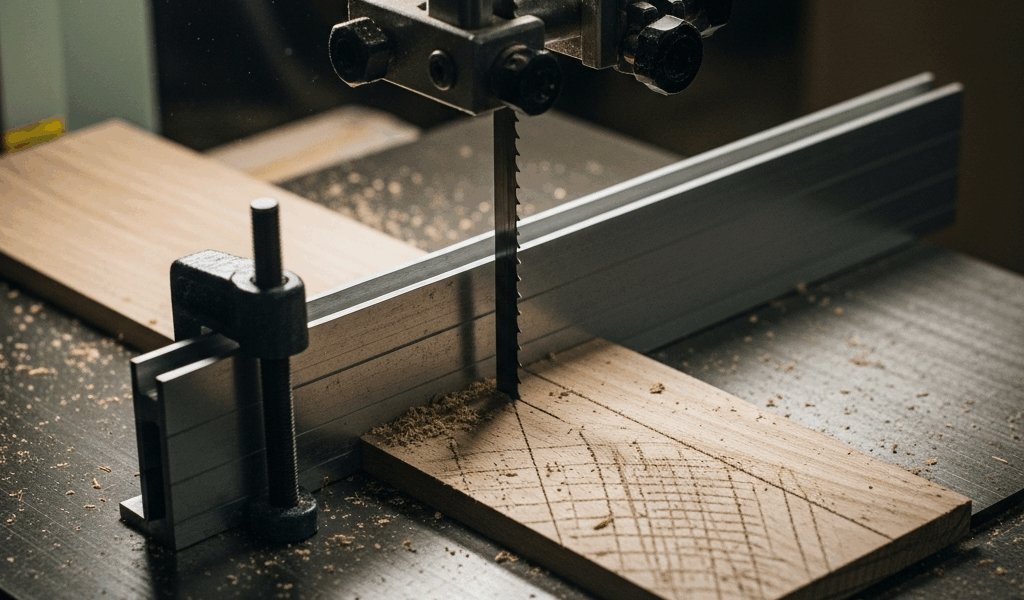
Tooth set is the side-to-side angle of the teeth. When set is even — alternating left, right, left, right down the entire blade — it tracks straight. When it’s worn or damaged, the teeth pull unevenly. Grab a flashlight and look at your blade up close under good light. Teeth on one side appearing flatter or more worn than the other, or set that looks irregular — that’s your problem right there.
Blade Tension Too Low
A blade running at low tension flexes under the sideways pressure of cutting. That flex makes it track offline. Single most overlooked cause of drift, full stop. Most factory tension settings are conservative — they prioritize blade life over cutting precision, which is a reasonable default for shipping a saw but terrible for actual woodworking. Your saw probably has a tension gauge on the side. That number is usually way lower than what you actually need.
Wrong Blade or Dull Blade
A 1/8-inch blade designed for tight curves behaves completely differently than a 3/4-inch blade for resawing thick lumber. They’re not interchangeable. A blade clogged with pitch, oxidized from heat, or worn past its useful life will drift badly regardless of how perfect your fence angle is. Sharpen or replace when you see discoloration on the teeth — dark blue or brown on the steel — or when cuts start requiring noticeably heavy pressure to push through.
How to Check and Adjust Blade Tension Correctly
Start with the deflection test. Frustrated by persistent drift on a walnut resawing project, I finally learned this from a bandsaw tech at a woodworking show in 2019. Took thirty seconds. Solved the problem I’d been fighting for three weeks straight.
Disconnect the saw from power first. Open the upper wheel guard. Grab the blade midway between the wheels with your thumb and forefinger and push sideways. The blade should deflect about 1/4 inch under moderate hand pressure — that’s the right amount of give. More than a half-inch means tension is too low. Barely any movement at all means you’re over-tensioned, which stresses both the blade and the bearings.
Most stock saws ship with tension somewhere around 500–1,000 PSI. For a 1/2-inch blade used for rip cuts, you want closer to 1,200–1,500 PSI. Thinner blades need less. Wider blades need more. Check your manual for the exact spec by blade width — it matters.
Adjust the upper wheel tension knob slowly. Quarter-turn increments. Test the deflection again after each one. I keep a small piece of scrap pine handy and make a quick test cut after every adjustment to feel the difference in real time. Sounds tedious. It is, a little. Still beats replacing a blade you didn’t need to replace or chasing an alignment problem that doesn’t exist.
Setting the Fence Angle to Compensate for Drift
This is the piece to know up front. This is the fix that separates people who just suffer through drift from people who actually work around it.
Even with correct blade tension and a blade in good shape, drift can still happen. Some saws have minor alignment quirks that are practically impossible to fully eliminate. Some blades have a slight natural preference for one direction. Instead of fighting physics, adjust the fence to match the blade’s natural cutting angle. That’s what makes this approach so endearing to us woodworkers — it costs nothing and works immediately.
So, without further ado, let’s dive in. Draw a bold pencil line on a piece of scrap wood — something at least 12 inches long. Run the wood through the saw without a fence, just your hands guiding it, letting the blade find its own path along that line. Watch where it cuts relative to your pencil mark. The blade will veer slightly left or right. That angle is your blade’s natural drift.
Now measure it. If the cut ended up 1/4 inch to the left of your line over a 12-inch push, that’s roughly a 1-degree drift. Loosen your fence and rotate it about 1 degree in the opposite direction — blade drifted left, angle the fence slightly right. The board feeds straight because the fence now matches the blade’s natural pull rather than fighting it.
Make the adjustment, run another pencil-line test, repeat. You’re looking for the fence angle where the blade tracks straight without binding. Might take two or three passes. Small angles matter more than you’d expect here — don’t over-adjust. Once you nail it, tighten the fence bolts and mark the position with a strip of blue tape. You’ll want to return to it, especially after swapping blades.
This trick solves drift without replacing anything. It works mid-project. It costs nothing.
When to Replace the Blade Instead of Adjusting
Some drift can’t be fixed with tension adjustments and fence angles. Replace the blade when:
- Teeth show heat discoloration — dark blue or brown on the steel. The blade has been running too hot, usually from dullness, and it won’t recover from that.
- The set is visibly uneven. Teeth on one side noticeably flatter than the other. That comes from wear or impact damage and tension adjustments won’t correct it.
- You’ve set tension properly, angled the fence, and still get excessive drift — more than 1/8 inch per foot of cut. The blade is done.
- The blade makes a high-pitched whine or chatters during the cut. Usually means a dull edge combined with broken teeth somewhere along the blade.
Stock common blade sizes for your saw. I’m apparently picky about blades and Starrett and Timber Wolf both work for me while cheaper house-brand options never seem to last. A 1/2-inch blade with 3 TPI handles general rip work and gradual curves. A 1/4-inch blade with 6 TPI handles tight radius cuts. A 3/4-inch blade with 2 TPI handles resawing thick lumber fast. Both brands run around $20–$35 per blade — they outlast the $9 alternatives by a significant margin.
The diagnostic order matters. Check blade condition first. Adjust tension second. Angle the fence third. That sequence solves 95% of drift problems without guesswork, wasted blades, or an afternoon of frustration.


Stay in the loop
Get the latest the workshop journal updates delivered to your inbox.