Why Your Sander Is Leaving Swirl Marks
Swirl marks on wood have changed quite a bit thanks to the conflicting advice flying around. Some people blame the sander. Others blame the finish. The real answer is usually simpler — and more fixable — than either camp admits. There are two distinct causes: a mechanical problem where your sander’s motion is literally carving arc patterns into the wood fiber, or a grit sequence failure where you jumped from 80-grit to 220-grit and those deep scratches are now locked in until you backtrack. Random orbital sanders still leave swirls when misused, despite their sterling reputation. Knowing which problem you actually have cuts your troubleshooting time in half.
Identify Which Type of Sander Is Causing the Problem
Each sander leaves a distinct swirl signature. Learning to see them is step one.
Orbital Sander Swirls
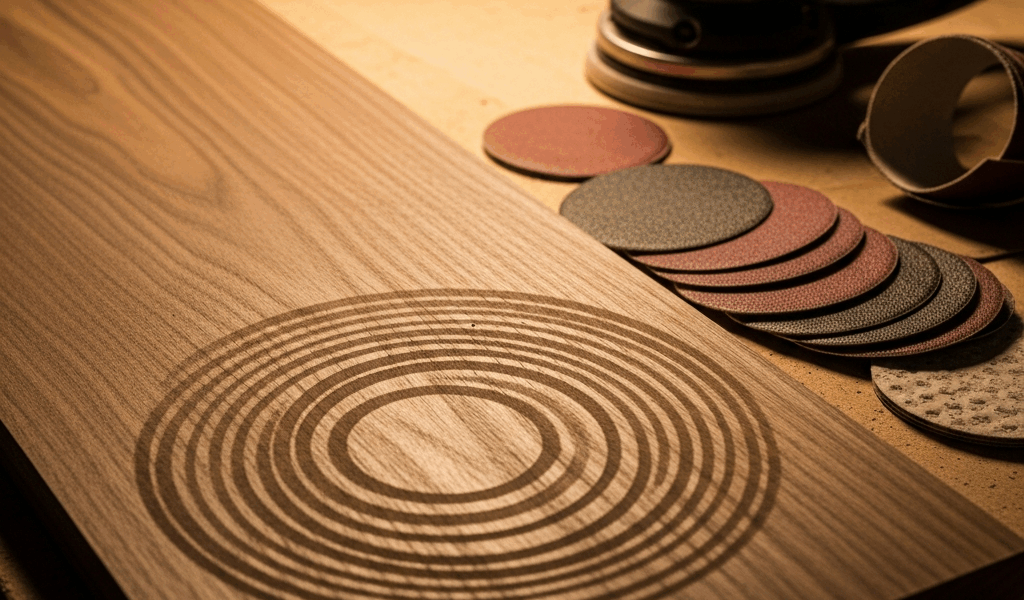
An orbital sander moves in tight circles — and those circles engrave themselves into soft woods especially hard. The pattern looks like concentric arcs, nested half-moons, when you catch it under a raking light. I once destroyed a walnut tabletop using a 5-inch orbital on final prep. Thought speed mattered more than pattern. It didn’t. The marks bled through every finish coat I threw at it.
Random Orbital Sander Swirls
These are subtler. The pad orbits and rotates simultaneously, which should eliminate pattern — but apply too much pressure or move too fast and the randomness breaks down completely. The swirls appear as faint, ghostly half-circles. Harder to see than straight orbital marks, but impossible to ignore once you know what you’re looking for. They catch light from certain angles and vanish from others. Maddening.
Belt Sander Swirls
Belt sander marks get mistaken for cross-grain scratches constantly, mostly because they run roughly perpendicular to grain direction when you’ve sanded at an angle. The pattern is more linear than circular, but it’s still a swirl problem if the belt angle is wrong. People sand at 45 degrees to speed up the work. They regret it every single time.
How to See What You’re Really Looking At
Stop guessing. Use a raking light. A cheap LED flashlight held at roughly 15 degrees to the wood surface reveals swirl marks that flat overhead lighting hides completely. I use a DeWalt DCL043 on job sites specifically for this — runs about $79, and it’s earned its keep a hundred times over. Point it across the grain, low and close. Any orbital pattern jumps out immediately. Sand a test board first. Inspect it under the raking light between grits. That single habit alone saves hours of wasted work.
Check Your Grit Sequence First — This Is Usually the Real Problem
Worth saying out loud. Grit jumping is the number-one swirl culprit I see, and it’s entirely preventable.
Skip grits and you leave scratches too deep for the next grit to erase in any reasonable amount of time. Jump from 80 to 220? Those 80-grit scratches run roughly 0.4mm deep. Your 220-grit pad will need 20 minutes of aggressive sanding just to reach the bottom of them. Most people give up after five minutes, call the wood ready, then watch the scratches reappear like ghosts under stain.
Here’s the correct sequence:
- 80-grit (material removal, rough prep)
- 120-grit (removes 80-grit scratches)
- 150-grit (removes 120-grit scratches)
- 180-grit (removes 150-grit scratches)
- 220-grit (final prep, removes 180-grit scratches)
Each grit must fully erase the marks from the previous one before you move up. Use that raking light between every step — not occasionally, every step. Sand until zero scratches from the prior grit are visible under the light. This takes discipline. It also takes about 40% longer than most people expect. That’s normal. Avoid the path I took of rushing it.
For softwoods like pine or fir, add a 100-grit step between 80 and 120. For hardwoods — oak, maple, walnut — the sequence above usually holds. Ultra-fine work or exotic species? Go to 240 or 320 after 220. But do not skip steps. Ever.
Fix Technique Issues That Make Swirls Worse
Assuming your grit sequence is locked in, technique can still sabotage you completely.
Pressure and Speed on Random Orbital Sanders
Too much downward pressure collapses the orbital motion and turns your random orbital into a glorified circular sander. Let the weight of the tool do the work — a typical 5-inch random orbital runs 3 to 4 pounds, and that’s genuinely enough. Pressing down hard kills the random orbit and causes swirls even with a perfect grit sequence. Move at a moderate, steady pace. Roughly one foot per second works well. Rushing lets the pad skip over high spots and creates uneven sanding that reads as swirls under any raking light.
Direction and Grain on Belt Sanders
Always sand with the grain. Always. A belt sander running at even 30 degrees off-angle creates scratches that cross-grain sanding on the next grit won’t fully erase — at least not without a frustrating amount of extra work. Stay parallel to grain direction, keep the belt flat and square to the wood, and keep moving. Hesitating in one spot lets the belt cut deeper and leaves ridges.
Worn Sanding Discs
This is the invisible killer. A disc used across three big projects looks fine but has loaded with dust and dulled from wear. It stops cutting efficiently and starts burnishing the wood surface instead. Burnished wood looks smooth. Finish reveals every swirl underneath it, though, because the fibers aren’t actually removed — just compressed. I’m apparently someone who held onto worn discs way too long, and my Mirka Abranet discs work great while cheap no-name pads never last past the first project. Replace discs more often than feels necessary. Sanding a full 4×8 sheet of plywood on a single disc? You’re stretching it too far. A five-pack of 5-inch 220-grit adhesive-backed discs runs $12 to $18. That’s nothing compared to stripping and re-sanding a finished piece.
How to Remove Swirl Marks That Are Already There
Swirls visible under raking light are deep enough to matter. Here’s the rescue sequence.
Drop back two grits from wherever the swirls first appeared. Showed up at 220? Go back to 180. Sand with the grain — moderate pressure, correct technique — until every trace of the swirl pattern disappears under the raking light. A tabletop usually takes 10 to 15 minutes at this stage. Then work forward through the sequence properly: 200-grit if you have it, then a final pass at 220. No shortcuts. No skipping the raking light check.
Before any finish goes on, hand-sand with 220-grit paper along the grain. Five or six light passes. This clears any remaining orbital pattern the power sander’s edge geometry may have left behind. Sounds obsessive. Works every time.
Fix the cause before you finish — that’s what makes this whole process worth it to us woodworkers. Swirls under stain are permanent. Swirls under polyurethane will catch the light and mock you every time you walk past that piece. Spend the extra 30 minutes now instead of two hours stripping later.


Stay in the loop
Get the latest the workshop journal updates delivered to your inbox.