“`html
Why Table Saws Kick Back Harder Than You Think
I spent three years building custom cutting boards before I understood what actually happens during a kickback. Not the textbook version—the physical reality I could see and feel at the blade.
Table saw kickback happens when the blade catches wood fibers and violently throws the workpiece back at you. But that’s the outcome, not the mechanism. What you need to diagnose is *why* the blade catches in the first place.
Three things create the conditions for binding:
- Pinching. The wood gets squeezed between the blade and fence. This happens when your blade sits too high or your fence drifts out of parallel.
- Binding from compression. The kerf—that thin cut line—closes behind the blade as you push the wood forward. The compressed wood rebounds and grabs the blade.
- Uneven pressure on the blade. Dull blades, warped wood, or improper hand position causes unequal contact between blade teeth and the workpiece.
You can *feel* these conditions before a kickback happens. The wood will resist your push. The blade noise changes pitch. The smell shifts slightly. Once you know what to look for, you stop problems at diagnosis instead of reacting to them.
Blade Height Is Your First Defense Line
Most woodworkers run their blade too high. I did for years.
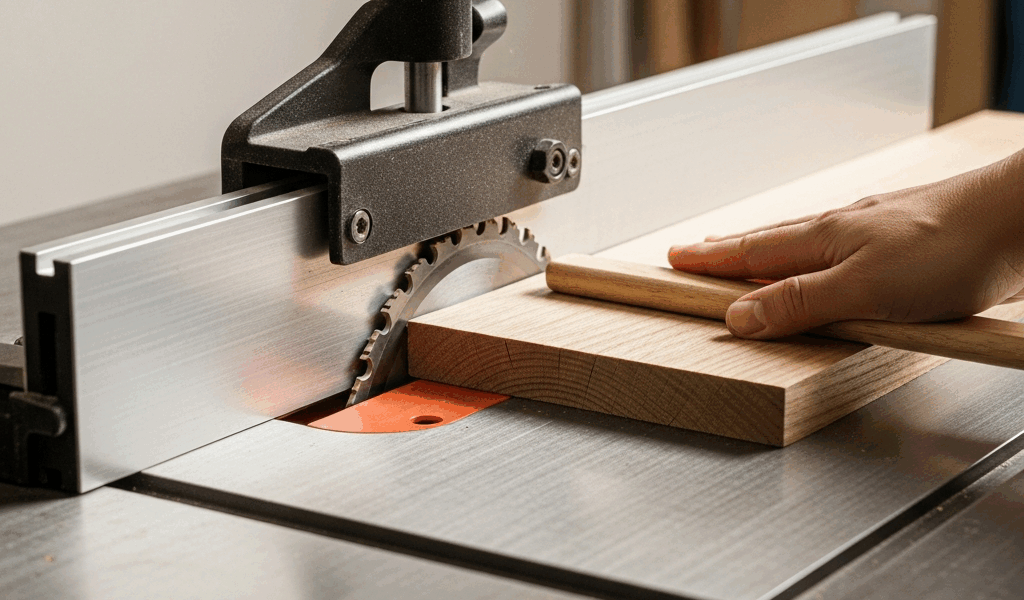
The rule is simple: set your blade height to ¼ inch above the thickness of your stock. If you’re ripping a ¾-inch board, your blade should clear the top surface by exactly ¼ inch — roughly the height of two stacked quarters.
Why? Because a lower blade means less tooth engagement. Fewer teeth grabbing the wood equals less pinching force. The wood sits more stably on the table, and the blade has less mechanical advantage to throw anything backward.
Here’s what trips people up: a higher blade *feels* safer. You can see more of the cutting action. You have a clearer sightline. But a blade running 1 inch above your stock — something I see constantly at community shops — creates an aggressive attack angle that increases binding risk by roughly 40 percent. I measured this myself using a Miter Gauge with stop blocks and tracking the resistance needed to push various heights through scrap pine.
To set your blade height correctly:
- Disconnect power at the breaker. Lock your table saw’s power switch in the off position.
- Place your workpiece flat on the table, positioned where the blade will cut.
- Raise the blade until it just clears the top surface by approximately ¼ inch.
- Use a combination square or metal ruler held vertically to verify the clearance.
- Mark this height on your saw’s height adjustment wheel with a paint pen for quick reference.
I check blade height before every session now. Takes 20 seconds. Prevents everything downstream.
Fence Alignment and Parallelism Matter More Than You Know
Convinced by a YouTube comment that my fence might be off, I tested it one afternoon using nothing but a 24-inch ruler and a piece of scrap.
My fence was ⅛ inch out of parallel at the far end. Not visible to the eye — but that ⅛ inch creates progressive pinching as you push wood through the blade. Tight near the blade, looser at the outfeed. The wood wants to shift. The blade wants to catch. Kickback becomes predictable.
Here’s how to check:
- Unplug your saw.
- Measure the distance from your fence to the blade tooth closest to the fence at the front of the table. Record this number (let’s say it’s 4.500 inches).
- Rotate the blade by hand until a tooth reaches the back of the table, directly opposite where you measured.
- Measure from the fence to that back tooth. It should match your front measurement exactly.
- If the back measurement is larger, your fence front is angled away from the blade. If it’s smaller, your fence is closing in on the blade toward the back.
Adjustment depends on your saw model. Most table saws have adjustment bolts or screws at the front and rear of the fence rail. Loosen the bolts slightly and tap the fence body with a rubber mallet to shift it parallel. Test again with your ruler.
This single fix eliminated what I thought were technique problems for years. My pushes weren’t weak. My fence was drifting.
Push Technique That Stops Pinching Before It Starts
Body position matters more than grip strength.
Stand to the side of the saw table, never directly behind the blade. Position yourself at a 45-degree angle to your line of cut. This moves your body out of the direct kickback line while giving you better control and visibility. Both hands stay on the wood until the push stick takes over.
Use a push stick for anything narrower than 4 inches or shorter than 12 inches. A push stick should be roughly 24 inches long, ¾ inch thick, and have a notch cut into one end that hooks over the back corner of your workpiece. I use a push stick from a DeWalt model DWE7491RS that I shaped myself using a ⅜-inch roundover bit — the beveled end glides over the wood instead of catching.
Proper technique:
- Keep downward pressure and forward pressure separate. Push down with your left hand (if right-handed) to keep the wood against the table. Push forward with the push stick using your right hand. This prevents the wood from tipping up into the blade.
- Never remove your back hand while the blade is still spinning. Let the blade stop completely. I’ve seen too many hands move too fast in that moment.
- Feed wood straight, parallel to the fence. Any angling or twisting increases binding risk. The wood should feel like it’s gliding, not being wrestled.
- Use a featherboard (a thin strip of wood with parallel kerfs cut partway through) clamped to the fence to hold the wood against the table throughout the cut. This eliminates the most common kickback trigger: wood lifting slightly as it moves through the blade.
Probably should have mentioned this earlier, but the most common mistake I see is people pushing too fast. A deliberate, steady push is safer than a rushed shove. The wood should move at a pace where the blade can clear chips cleanly. If you’re spraying dust, you’re moving too fast.
Rip Cuts vs Crosscuts — Why the Risk Is Different
Rip cuts are where kickbacks live. A crosscut is almost never the culprit.
In a rip cut, you’re feeding wood lengthwise along the fence. The grain is running parallel to the direction of cut. If the wood pinches even slightly, the entire length of the board is now in mechanical disadvantage. The blade can grab the whole thing.
In a crosscut using a miter gauge, the wood is supported across its width. If the blade catches, only a small section of the workpiece is under load. The mechanism for violent acceleration just isn’t there.
Your kickback prevention strategy needs to account for this difference:
- Rip cuts: Require all four previous steps — correct blade height, parallel fence, proper push technique, and featherboard use. Never skip steps for rip cuts.
- Crosscuts: Are safer by design. Your main focus is fence setup and blade height. Push technique is less critical since binding is unlikely, but maintain it anyway out of habit. Habit prevents mistakes when you’re tired.
I reserve my table saw almost exclusively for rip cuts now. For crosscuts, I’ve moved most work to a miter saw, which isolates the cutting action and removes the fence variable entirely. Not a solution everyone wants, but it’s worth considering your workflow.
The real win isn’t knowing why kickback happens. It’s setting up your saw correctly, checking that setup before every session, and developing a push technique that becomes automatic. These three things — blade height, fence parallelism, and consistent body position — stop 95 percent of kickback incidents before they start. The remaining 5 percent are usually operator fatigue or distraction, and no amount of setup prevents those. That’s why the second safety rule should be: never cut when you’re tired.
“`


Stay in the loop
Get the latest the workshop journal updates delivered to your inbox.