Table Saw Blade Not Cutting Straight — Fix It Now
Table saw troubleshooting has changed quite a bit thanks to the conflicting advice flying around. Every forum has a different answer. Every YouTube comment section turns into a war. I’ve stood in my shop at 11pm, deadline looming, staring at a board that came off the saw looking like a parallelogram — and I had no idea where to start. That was 2019. I’ve since worked through this problem enough times that I know exactly which rock to look under first.
Today, I’ll share it all with you.
But what is a crooked cut, really? In essence, it’s your blade and your workpiece disagreeing about geometry. But it’s much more than that — it’s a symptom, and the actual cause could be hiding in three completely different places. Your fence. Your blade. Or the arbor itself. Most articles hand you a generic checklist and call it a day. We’re not doing that. We’re diagnosing first, then fixing with actual confidence.
How to Tell Where the Problem Actually Starts
Before touching anything, figure out which system is failing. Three main suspects: fence alignment, blade wobble, or arbor runout. Each one produces a crooked cut. Each one needs a completely different fix. Don’t skip this part.
Test One — The Fence Alignment Check
Unplug the saw first. Always. Now spin the blade by hand and measure the distance between a blade tooth and your fence at the front of the table. Use a combination square or a decent caliper. Spin the blade another quarter turn — now you’re measuring at the rear. If those two numbers differ by more than 1/16 inch, your fence isn’t parallel to the blade. That’s your culprit. Good news: no parts required to fix it.
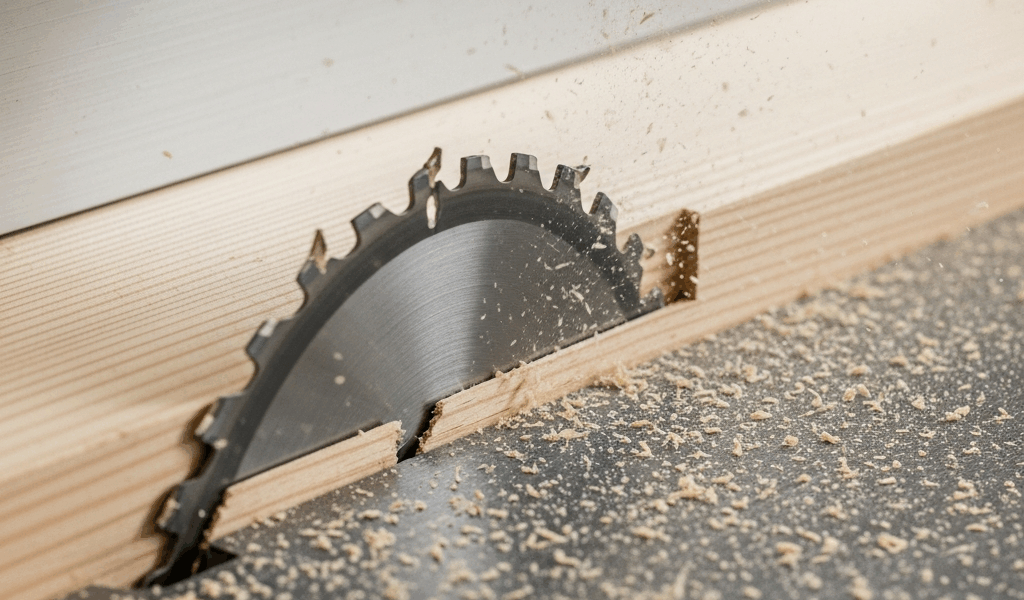
Test Two — The Wobble Spin
Still unplugged. Remove the blade, reinstall it snugly, then hand-spin it slowly while watching the edge pass a fixed reference — a strip of painter’s tape on the table works, or hold your fingernail steady nearby as a reference point. A blade cutting true spins in a flat plane. A blade with wobble rocks side to side. If you see that rocking motion, you’re looking at a loose arbor nut, debris sandwiched between the blade and flange, or a warped blade. This test catches most problems in about 45 seconds.
Test Three — The Arbor Runout Test
This one requires a dial indicator — about $12 at Harbor Freight, specifically the Central Machinery 92447 if you want the exact one I use. Remove the blade entirely. Mount the indicator so the probe contacts the arbor shaft itself, not the blade mounting surface. Spin the shaft slowly and watch the needle. Total indicator runout above 0.003 inches means worn bearings or a damaged shaft. That’s a different conversation entirely, and I’ll get to it below.
Run all three tests before moving on. One of them will point you directly at the fix.
Fixing a Fence That Is Not Parallel to the Blade
Worth putting near the top. Something like 90 percent of crooked cuts I’ve seen trace straight back to fence misalignment. The fence bolts to the table at two points — front and rear — and even a tiny angular difference between those attachment points corrupts every single cut you make afterward.
I prefer a dial indicator for this adjustment because it removes the guesswork entirely. Clamp it to the table with the probe touching the blade halfway up its height, near the front teeth. Write down that number. Slide the whole setup to the rear of the table — same distance from the fence, same probe height. Write down that number. They should match within 0.005 inches. If they don’t, the fence needs adjusting.
Most saws have an adjustment bolt at the rear of the fence rail — loosen it slightly, not all the way off, just enough to allow movement. Turn it in or out to nudge the rear of the fence toward or away from the blade. Check the indicator again. Keep going until both readings sit within tolerance. On my old Ridgid R4512, this whole process takes about eight minutes once you know what you’re doing.
Steer clear of where I went wrong. For years I’d get the alignment perfect, lock the fence down hard — really crank it — and then wonder why the next cut was still off. Turns out the locking handle itself was shifting the fence slightly when overtightened. Lock it firmly enough that there’s zero movement, but you’re not trying to compress metal. The fence should hold position, not deform under your grip.
After locking, run one test cut on scrap that matches your project material in thickness. Parallel and even? Done. Still wandering? Move to the wobble diagnosis below.
Stopping Blade Wobble Before It Ruins the Cut
A blade that isn’t spinning true will cut a beveled edge regardless of how dialed-in your fence is. Wobble comes from three places: a loose arbor nut, debris trapped between the blade and flange, or a warped blade. Work through them in that order.
The Arbor Nut and Flange Check
Unplug the saw. Find the arbor nut — the large nut securing the blade to the shaft. Worth knowing: on most table saws it tightens counterclockwise, opposite of standard hardware. Use the blade wrench that shipped with the saw and get it snug. Not brutal. Snug. You’re not competing in anything.
Remove the blade and look at both flanges — the metal discs clamping either side of the blade. A warped flange causes just as much wobble as a loose nut, and it’s easy to miss. Lay a straightedge across each flange while it’s mounted on the arbor. Daylight between the straightedge and the flange surface means the flange is bent. That’s a replacement situation. Flanges typically run $20 to $40 depending on your saw — I replaced one on a Bosch GTS1031 last year for $28 shipped.
Before reinstalling the blade, wipe the arbor shaft and both flanges with a dry cloth. Sawdust and pitch build up there and tilt the blade off-plane without you ever knowing it. Reinstall, hand-spin, confirm the wobble is gone.
The Blade Itself
A warped blade doesn’t come back from that. If you’ve eliminated the nut and the flanges and wobble persists, the blade is the problem — and it should be retired. A quality 10-inch carbide blade runs $35 to $75 depending on tooth count and brand. I’m apparently a Freud convert at this point, and their LU83R010 in the $55 range works for me while cheaper no-name blades never seem to hold up past a few months of regular use.
What to Do If the Arbor Itself Has Runout
Dial indicator showed more than 0.003 inches of runout at the shaft itself? The bearings are worn or the shaft is damaged. This is not a weekend hobbyist fix — at least not without some mechanical confidence and the right service documentation for your specific saw.
Arbor runout develops slowly over years of use. The spindle bearings wear down, the shaft develops a slight wobble, and no amount of fence adjustment or blade swapping will ever fix it because the problem is upstream of all that. Some saws use a simple bearing cartridge — $40 to $80, roughly an hour of work with the manual open. Others require pulling the motor entirely, which is a two-person job and might mean a trip to a service center.
Call the manufacturer with your model number before assuming the worst. They’ll tell you whether this is a field repair or a professional job. Either way, stop cutting on a saw with runout. The blade will never track straight, and you’ll burn through material chasing a problem that physically cannot be solved at the fence.
Quick Checks to Run Before Every Rip Cut
Prevention beats diagnosis every time. Ninety seconds before any rip cut, run through these five things. Confirm the fence lock is fully engaged — give it a light push to verify it hasn’t moved. Check blade height — high enough to cut cleanly, low enough to stay safe without binding. Look at the blade surface for pitch buildup or chipped teeth. Verify the miter slot is still parallel to the blade, since dust and wear shift this over time. And set your push stick within reach before the motor ever starts.
That’s what makes these habits endearing to us shop workers — they’re boring, they take 90 seconds, and they eliminate 80 percent of the problems before the blade ever spins.


Stay in the loop
Get the latest the workshop journal updates delivered to your inbox.