Pocket Hole Spacing Gone Wrong — Here’s How You Actually Fix It
Pocket hole joinery has gotten complicated with all the conflicting advice flying around. As someone who has burned through a embarrassing number of boards chasing down blowouts and weak joints, I learned everything there is to know about what actually causes pocket hole failures — and how to stop them before they wreck your project. Today, I will share it all with you.
My first real disaster was a Kreg R3 and a stack of 3/4-inch maple. Joints looked immaculate during dry-fit. Clamped down solid. Then I drove the screws and heard that little crunch nobody wants to hear. Tip punched straight through the face. Ruined a $40 board in about four seconds. The jig manual didn’t save me. Working backward from the actual failure did.
Why Pocket Hole Joints Fail in the First Place
Three things kill pocket hole joints — almost nothing else. First, the depth collar is calibrated for stock that isn’t what you’re actually drilling. Second, the screw length is mismatched to pocket depth and material thickness. Third, pieces are pulled together under screw pressure before they’re flush, so misalignment gets baked in permanently.
Most woodworkers blame the jig. It’s almost never the jig. Probably should have opened with this section, honestly — would have saved me a full Saturday of re-drilling 18 test joints trying to figure out why my Kreg K4 was “broken.”
That’s what makes pocket hole joinery endearing to us woodworkers — once you understand the system, the margin for error shrinks to almost nothing. So, without further ado, let’s dive in.
Screw Blowing Through the Face of the Board
This one is impossible to miss. You tighten the screw, hear a crunch, and the tip emerges from the opposite face like it has somewhere to be. Joint destroyed. Board ruined. Day derailed.
But what is actually happening here? In essence, it’s a length mismatch between screw and pocket. But it’s much more than that — usually the collar setting is off too, which compounds the problem.
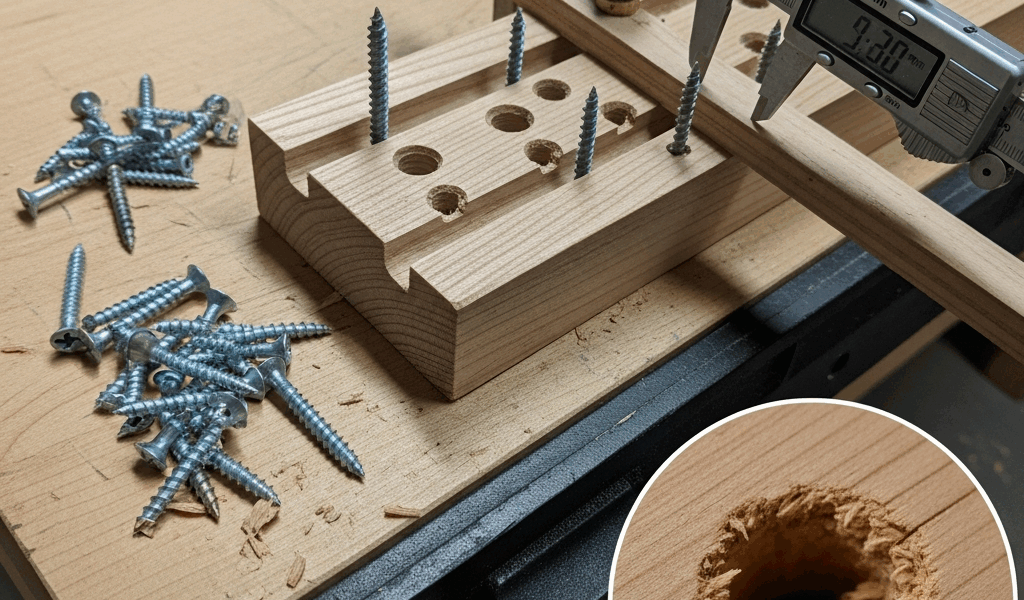
The fix requires measuring, not guessing. Grab calipers — not a tape measure — and check your actual stock. A board sold as 3/4-inch will frequently measure 11/16-inch. A 1-inch board might come in at 15/16-inch. That 1/16-inch gap seems trivial. It’s not. Set the Kreg collar to your measured dimension, lock it firmly, and drill a test pocket in scrap first. This takes maybe 90 seconds. It eliminates blowout entirely.
Then match screw length to material thickness. The pairings aren’t suggestions — they’re the working range that keeps the tip where it belongs:
- 3/4-inch stock: 1-1/4-inch coarse-thread screws
- 1-inch stock: 1-1/2-inch screws
- 1-1/2-inch stock: 2-1/2-inch screws
One more detail worth knowing. Solid hardwood takes coarse-thread Kreg screws — the blue-labeled box. Plywood and MDF need fine-thread — the yellow box. Fine threads grip better in veneer core and particleboard. Coarse threads in plywood is why a joint holds fine on Monday and feels spongy by Wednesday. I’m apparently a slow learner on this one, and the yellow box works for me now while the blue box never did in sheet goods.
Joint Feels Weak or Pulls Apart Under Load
Weak joints are a different problem entirely. No blowout. Looks solid at assembly. Then you put weight on that shelf you built — or a client does, three weeks later — and the joint starts giving. The screw didn’t fail. The connection was just structurally insufficient from the start.
First suspect: screw is too short to fully engage the receiving board. Check that threads are actually biting into receiving material, not just floating in pocket space. If length is correct, the problem is pocket hole count per joint width. One pocket hole per connection works fine up to 12 inches of edge. Past that, add a second. For a 24-inch panel joint, two screws, staggered slightly to avoid cross-grain stress. For anything 36 inches or wider — three screws minimum.
End grain connections are the real trouble spot. A single pocket hole into end grain is not a structural joint. Don’t make my mistake — I built an entire base cabinet with end-grain pocket holes only and it was sagging within four months. End grain fibers don’t grip fasteners the way long grain does. Add waterproof glue in the pocket. Add a second screw if joint width allows. Or run a dowel, biscuit, or cross-grain spline through the joint alongside the pocket hole. That combination is structural. The pocket hole screwed into end grain alone is not.
Faces Are Misaligned After Assembly
Pocket spacing is perfect. Screw length is correct. But after tightening down, one board face sits proud of the other by 1/8-inch or more. There’s a step at the joint. This is a clamping sequence problem — not a jig problem.
What happens: the screw drags the pocket-hole board inward at a slight angle as it seats, before the faces are truly flush. That angle locks in under screw tension. Unclamp, and the step is permanent.
The fix is sequence. Clamp flush-face first — Kreg face clamp, Bessey bar clamp, whatever you have — before driving a single screw. Both pieces held perfectly flat. Then drive the screw. Then release the clamp. The screw’s job is to hold, not to align. That ordering matters more than almost anything else in this process.
For slippery surfaces like melamine or lacquered MDF, clamps actually migrate under screw pressure. Blue painter’s tape works better here. Lay two strips sticky-side-up along the joint. Place boards face-down on top and press firmly. The tape grips both undersides. Drive your pocket holes with zero migration. Takes longer than clamping. Worth every extra minute.
Panel clamps beat bar clamps for wide boards — at least if you’re working with anything over 12 inches. A Bessey REVO or Jorgensen 3700 applies even pressure across the full face width, not just at two contact points. Pieces stay flush through the entire screw-driving process.
Quick Diagnostic Checklist Before You Drill Again
While you won’t need a full machine shop, you will need a handful of basic tools — calipers, the right screw boxes, and a few minutes of discipline before every setup.
- Measure stock thickness with calipers, not a tape measure. Write the actual number on painter’s tape stuck to your bench. Set the jig collar to that number — not the lumber tag.
- Verify the collar is locked tight. A loose collar drifts mid-hole and changes pocket depth incrementally. Check it three times. Seriously.
- Cross-reference screw length on the Kreg compatibility chart. Match to measured thickness, not assumed thickness. These are different things.
- Confirm screw thread type against material. Hardwood gets coarse-thread. Plywood and MDF get fine-thread. Check the box before opening it.
- Inspect the drill bit for wear. A dull Kreg bit wanders and produces oversized pockets. Replace bits every 50 to 75 holes — sooner in hard maple or hickory.
- Count pocket holes per joint width. One screw under 12 inches. Two for 12 to 24 inches. Three for anything wider.
- Clamp flush-face before driving the screw. Every single time. The screw is not an alignment tool.
Run through this list before every setup. Two minutes, maybe three. It stops roughly 95 percent of spacing failures before they happen. The remaining 5 percent is almost always a worn bit or wrong screw box — both cheap fixes. A ruined board of figured walnut at $18 a board-foot is not a cheap fix. Ask me how I know.


Stay in the loop
Get the latest the workshop journal updates delivered to your inbox.