“`html
Why Drill Press Wobble Matters for Your Work
A drill press wobbling at speed ruins accuracy in ways that show up instantly. Hole diameters creep wider than they should. Bit life plummets because the cutting edges aren’t engaging evenly—you’re burning through expensive carbide on one side while the other sits idle. Finish goes rough. And honestly, there’s the safety factor: a wandering bit can catch and twist the workpiece or bind the chuck, which gets genuinely unpleasant when your hand is anywhere near the table.
I spent two years ignoring a persistent wobble in my old 16-inch floor press before it bit me. The thing is, wobble doesn’t announce itself as a catastrophic problem. It’s insidious. You accept slightly oversize holes. You buy more bits. Then one day you’re drilling 0.500″ holes for a precision jig and your bit wanders 0.030″ off-center, and suddenly you’re back at square one.
The good news: most wobble isn’t the death knell it feels like. It’s almost always fixable without a full spindle replacement. You just need to know where to look.
Identify the Type of Wobble You Have
Wobble can come from three main places, and they feel different. Pinpointing which one is your problem cuts diagnosis time in half.
Chuck runout is the most common culprit. The bit itself spins off-center. You’ll see the flutes describing a small circle when you look straight down at the spinning bit from above—this is your first clue something’s off. Usually it means either the chuck jaws are dirty, the bit isn’t seated fully, or the chuck itself is worn out from years of use.
Spindle side-play feels looser and softer. The entire quill moves up and down or side to side with only hand pressure. You can grab the chuck and wiggle it like you’re jiggling a door handle. This points to spindle wear or bearing failure—more serious territory, and honestly, the kind of problem that keeps me up at night.
Table misalignment is sneakier. The table itself tilts or sits cocked relative to the spindle, so bits drill at an angle. It feels like the hole wanders as you bore deeper, not necessarily that the bit wobbles visibly when you’re standing there watching it spin.
Start here: Install a piece of scrap hardwood or aluminum in your vise on the table. Insert a standard 0.250″ or 0.375″ twist bit and lock the quill feed. Now spin the chuck by hand slowly while watching the bit. Can you see the flutes tracing a visible circle? That’s runout. Is the entire assembly loose and sloppy when you try to wiggle the chuck with your hand? That’s spindle play. Does a test hole come out visibly elliptical or drilled at an angle? That’s often table tilt or severe runout combined—probably should have mentioned that earlier, honestly.
Test and Fix Runout in the Chuck
Runout testing is straightforward, and you can solve most of it without special tools or a trip to the local machine shop.
First: Clean the chuck jaws thoroughly. This alone fixes maybe 40% of wobble cases—seriously, I can’t stress this enough. Use a brass brush or an old toothbrush with solvent (mineral spirits works fine) and scrub inside the tapered bore where the bit seats. Dirt and old oil prevent the bit from seating fully. Let it dry completely before moving forward.
Insert a fresh bit—preferably a good-quality twist bit, not some dull import that’s been sitting in the discount bin. Tighten the chuck firmly by hand. Most people don’t tighten hard enough. You want real pressure; this isn’t delicate work. Some presses have a tightening sleeve you rotate; others use a three-jawed chuck key. Use the key if you have one—you’ll get better pressure and consistency that way.
Spin the chuck slowly by hand again. Watch the bit flutes. If wobble is gone or reduced to barely visible, you’re done. Note the improvement and move on to your next project.
If wobble persists, remove the bit and check its shank. Twist bits can develop a slight bend over time. Replace it with a known-good bit and retest.
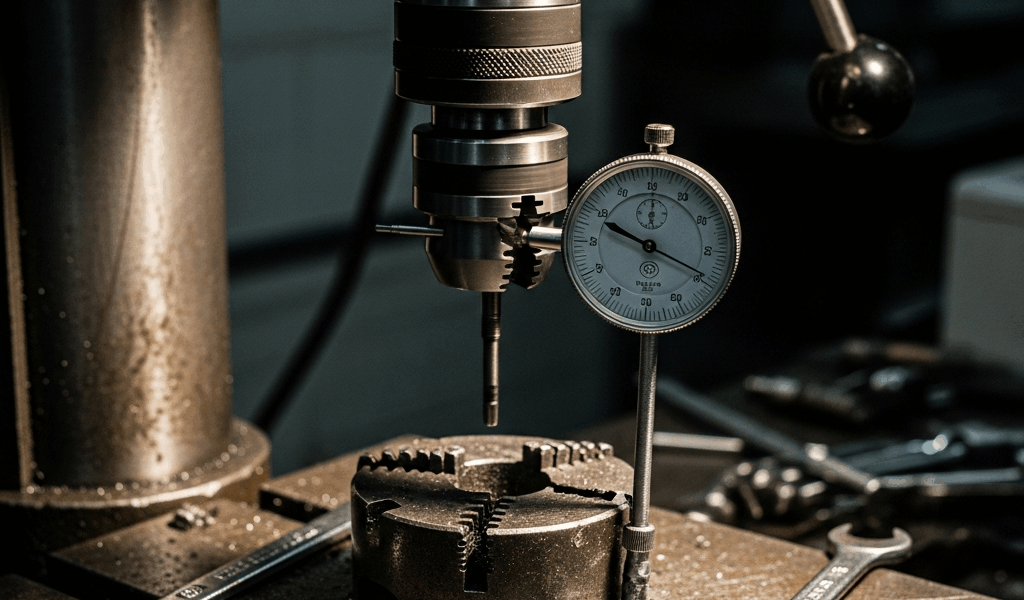
If a clean chuck and fresh bit still show runout, the chuck jaws are worn. This is when you measure with what’s called Total Indicated Runout—TIR in machinist speak. Install a dial indicator on the table with the tip touching the bit flute at the furthest point from center. Zero the dial. Rotate the chuck one full turn. The needle sweep tells you your runout. Anything under 0.005″ is acceptable for general shop work. Beyond 0.010″ and you should replace the chuck—don’t drag your feet on this one.
A new chuck for most consumer drill presses runs $50 to $150 depending on size and quality. Installation is usually just unthreading the old one from the spindle and threading the new one on—five minutes with a chuck wrench, and you’re back in business.
Check Spindle Wear and Quill Alignment
Spindle wear is different from chuck runout and much less forgiving. Probably should have opened with this section, honestly.
Grab the chuck with both hands and try to move it side to side and up and down without engaging the quill feed. On a healthy spindle, there should be essentially zero movement. You might detect a hair of movement, but it should feel rock-solid. If the chuck moves visibly—even a couple millimeters—the spindle bearings are shot, and you’re looking at a different kind of problem altogether.
If you have access to a dial indicator, the proper test is to clamp the indicator to the quill and touch the spindle itself (not the chuck). Measure runout at the spindle surface. Again, under 0.005″ is good. Past 0.010″ suggests wear that’s progressed further than you’d like.
Here’s the hard truth: spindle wear usually requires professional service. Some spindles can be shimmed or resurfaced by a machine shop, which costs $200 to $400. Full spindle replacement runs $300 to $600 in labor plus parts. Some cheaper presses aren’t worth the service cost, and you’re looking at replacement equipment instead of repair work.
I’ve seen people try to live with moderate spindle play by accepting that precision work is off the menu. That’s a valid choice if your press handles general woodworking and metalwork just fine. But if you need accuracy, spindle wear is the moment to make a decision: repair it or move on to something that works better.
Table and Head Alignment Quick Checks
A tilted or misaligned table creates wobble-like symptoms without the bit actually wobbling at all—and this is where many people get confused about what’s really happening with their equipment.
Use a machinists’ square or a good quality carpenter’s square. Place it against the spindle and table surface simultaneously. There should be no gap. If light shows through, your table is tilted. Some drill presses have adjustment bolts under the table that let you shim it level. Consult your manual for the specific procedure—it varies wildly by manufacturer and model year.
An easier check: Use a machinist’s level on the table surface. It should read level in both directions. If not, tighten the bolts that hold the table to the column and see if that settles things. Vibration over time can loosen these without you even noticing it happening.
Column alignment is harder to assess without precision tools. If your spindle tests clean and the table is level, and wobble persists, the head assembly might be bent or misaligned. This is usually a “call a professional” or “time for a new press” moment, and I won’t sugarcoat it.
When to Replace vs. Repair
Decision time comes down to three factors: cost, your skill level, and how much accuracy you actually need for your work.
Chuck replacement. Do this yourself without hesitation. $50 to $150, takes five minutes, solves runout 90% of the time. No brainer at all.
Bit maintenance and cleaning. Always, every time. Costs nothing. Fixes wobble regularly and keeps your press running longer than you’d expect.
Spindle service. If your spindle shows wear, get a quote from a local machine shop first. If it’s $200 to $300, weigh it against your press’s value and your actual need for precision work. A used mid-range drill press costs $150 to $400 depending on size and condition. Sometimes replacement wins on pure economics.
Accepting minor wobble. If you test everything above and find minor runout (under 0.005″), your press might just be on the older side. Some vintage iron has always run loose by design. If it drills clean holes in your materials and you’re not pushing precision tolerances, keep using it. Don’t make my mistake of chasing perfection when good enough is actually good enough.
The reality is this: most wobble fixes cost nearly nothing and take an afternoon of your time. Test your chuck, clean it, replace it if needed. Inspect spindle play carefully. Level your table and tighten those bolts. Ninety percent of the time, one of those steps solves the problem completely. The remaining 10% requires either professional service or new equipment—and that’s when you make the business decision about what to do next with your drill press.
“`


Stay in the loop
Get the latest the workshop journal updates delivered to your inbox.