What That Burn Mark Is Actually Telling You
Wood burning after sanding has turned into a moving target with all the conflicting advice flying around. But here’s the thing — it’s not a mystery. It’s not bad luck. It’s friction, and friction has a cause you can find and fix.
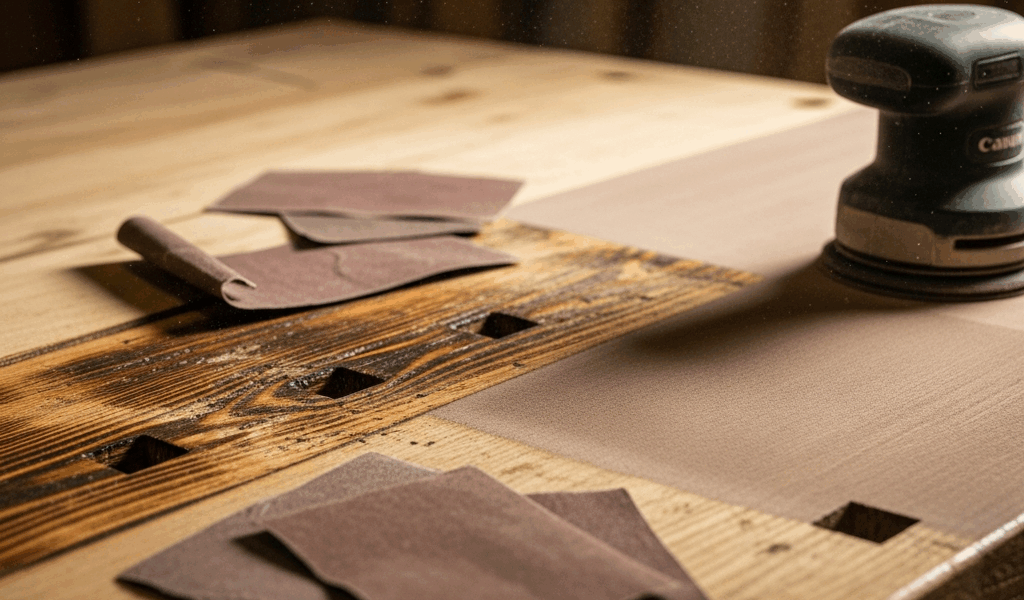
I spent two years chasing burn marks with more sanding before I realized I was making them worse every single time. Skip the misstep I made. The scorch patterns themselves are diagnostic. A thin dark streak following the grain direction? That’s loaded paper talking. A wider, diffuse scorch zone that ignores the grain entirely? Too much pressure — or you’re camping on one spot too long. A localized hot spot that seems completely random? Could be a worn disc, an unbalanced orbital pad, or a flat spot on a belt sander.
Before grabbing a fresh sheet of 220-grit, look at where the burn actually landed. What shape is it? Does it follow the wood’s grain or cut across it? Thin line or wide zone? That visual tells you what went wrong. And that diagnosis — honestly — saves you hours of frustration you don’t need to have.
Loaded Sandpaper Is the Most Common Culprit
But what is loading? In essence, it’s when abrasive pores pack up with resin, pitch, and fine dust. But it’s much more than that — it means your paper has stopped cutting and started polishing. Polishing generates heat instead of removing material. Heat plus resinous wood equals char. Every time.
Check for loading with your eye first. Then run a finger across the disc or sheet. Fresh 120-grit catches your skin slightly — that little drag is the texture doing its job. Loaded paper feels smooth. Almost waxy. Glazed, really. That glaze is the giveaway.
Pine loads faster than oak. Cherry loads faster than maple. Ash barely loads at all — I’ve run 80-grit on ash across an entire tabletop without a single burn mark. The reason comes down to resin content. Softwoods like pine release pitch when they heat up, and that pitch sticks to the abrasive faster than dust does, especially in the 80 to 120 grit range where particles are still large enough to trap material in the pores.
You have three options when paper loads. First: change it. A fresh sheet costs about three dollars. Second: clean it. A rubber abrasive eraser — the kind marketed specifically for belt sander maintenance — pulls caked dust and resin right off. Grind it against the spinning disc for five seconds and watch the dust cloud clear. Third: accept you’re done with that sheet. If you’re on pass five with the same grit and the paper’s glazed, you’ve already lost cutting efficiency and gained serious burn risk.
Worth saying out loud. I once burned a cherry dresser top because I ran out of 150-grit and tried to power through with a sheet of 120 that had been sitting in my truck for two years. Apparently I’m the type of person who stocks sandpaper after disasters instead of before them, and that Klingspor sheet I finally bought the next morning cost me a full afternoon of repair work.
Speed, Pressure, and Dwell Time — The Three Variables You Control
Your machine has settings. Your hands have pressure. Your brain controls rhythm. All three matter more than most people admit.
Too slow an orbital speed lets heat build up right under the pad. With a random orbital sander running at 5,000 OPM, a light pass moves heat away fast enough. Drop to 2,000 OPM and that same pass duration becomes a heat source — at least if you’re working with cherry or walnut. Belt sanders are less forgiving here. A slow belt digs in harder and concentrates friction in ways that feel almost vengeful.
Pressure is the variable most woodworkers consistently misjudge. “Light pressure” doesn’t mean the tool’s barely making contact. It means the weight of the tool itself. Nothing more. The moment you lean body weight into the handle, you’ve tripled the downward force. Tripled force means tripled heat. On cherry or walnut, that’s a visible burn in about two seconds flat.
Dwell time kills surfaces. If your hand stops moving for even one second on the same spot, heat concentrates there. A random orbital sander can scorch faster than you’d expect. A belt sander will char visibly in under a second if you’re not feeding it through smoothly and continuously.
The technique that works: keep moving. Overlap passes slightly. Light touch. Let the machine do its actual job. Feel resistance? You’re either pressing too hard or the paper’s loaded — and honestly, usually both at the same time.
How to Remove Burn Marks Without Losing Your Flat Surface
So you’ve got a dark line sitting across your sanding surface. Now what?
First: don’t chase it with power tools. I’ve watched people sand the same burn mark four times, trying to fix it with the exact technique that caused it. That cycle doesn’t end. Stop it immediately.
Hand sand across the grain using 80 or 100-grit paper. Yes — across the grain. You’re breaking the scorch line mechanically, not heating it away. Once the dark streak fades, switch to hand sanding with the grain at progressively finer grits to blend the scratches back in. 100, then 120, then 150. Slower? Yes. Does it work without enlarging the problem area? Also yes.
For heavy char — the kind that’s actually slightly raised above the surface — a cabinet scraper is flat-out superior to sandpaper. A sharp scraper removes surface char in two or three passes, zero heat risk. A dull scraper just smears the char and reheats the wood. Keep the scraper sharp or it’s a complete waste of time.
If the burn runs deep enough that hand sanding won’t touch it, you’re looking at planing or scraping the entire surface down to depth. That’s a different problem. The burn mark just told you your previous sanding speed was too aggressive for that specific wood at that specific grit. That’s actually useful information.
Preventing Burns on Your Next Pass
Start every sanding session with a fresh disc or sheet. That’s the baseline. Load your machine or pad correctly — an unbalanced orbital pad wobbles and creates hot spots that feel almost impossible to track down. Check paper visually before the first pass. Confirm speed. Light pressure only. Keep moving.
Here’s your checklist:
- Fresh abrasive — glazed or loaded paper goes directly in the trash, not back in the drawer
- Correct grit for your wood species — 80 or 100 on resinous softwoods, 120 or 150 on hardwoods
- Orbital speed at maximum setting unless the manual specifically says otherwise
- Pressure: tool weight only, no body weight involved
- Continuous motion — no stops, no slow spots, no hesitation
- Disc cleaning between passes if you’re hitting the same grit for a third time
On especially resinous woods — pitch pine, reclaimed heart pine, old-growth fir — a cabinet scraper or hand plane might be the best option for final surfacing, as that work requires zero friction heat. That’s because these tools remove material through cutting rather than abrasion, which changes the whole dynamic entirely.
Most burn marks are a paper condition problem, not a technique failure. Your approach was probably fine. The abrasive just quit working on you. That reframe matters — because next time you’ll catch the issue earlier, and the burn mark won’t happen at all.

Stay in the loop
Get the latest the workshop journal updates delivered to your inbox.