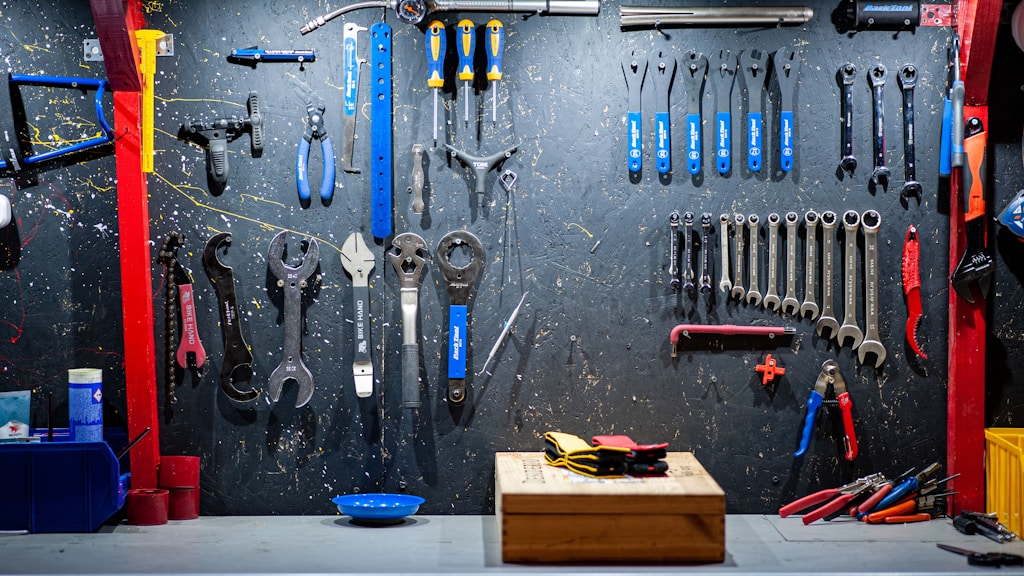
Professional shops didn’t adopt French cleats because they’re trendy. They adopted them because the system solves wall storage better than any alternative. Simple geometry, infinite flexibility, and a weekend of work transforms a bare wall into organized tool storage that actually works.
The Geometry That Makes It Work
French cleats use matching 45-degree bevels. A wall-mounted strip has the bevel facing up and out. A tool holder has the bevel facing down and in. The holder drops over the wall strip and gravity locks everything in place. Lift to remove, drop to install. No hardware, no fumbling, no tools required.
The beauty is in the modularity. Once you’ve installed cleats on the wall, any holder works anywhere on that wall. Reconfigure your layout in minutes. Add new holders without modifying existing ones. Move tools between walls without any hardware changes.
Wall Strip Installation
Rip your cleat strips from 3/4″ plywood at 3 to 4 inches wide with a 45-degree bevel on one edge. Baltic birch works well; construction plywood works fine too. The critical dimension is the angle, not the material.
Install strips horizontally with 3″ deck screws into every wall stud. Space the strips 3 inches apart vertically. This spacing allows holders of various sizes to hang without interference while maximizing wall coverage.
Level is essential. Use a laser level or long spirit level to ensure perfect horizontal alignment. If strips aren’t level, holders hang crooked and may not seat properly.
For a typical 8-foot wall section, you’ll install 8-10 strips running the full width. Total material cost: roughly $50-80 in plywood. Time investment: 3-4 hours including ripping and installation.
Building Holders That Actually Work
Start with simple holders: a plywood back with the matching 45-degree bevel, plus whatever front configuration holds the tool. Screwdriver holders are just a series of holes drilled in a strip mounted to the cleated back. Chisel holders add a front ledge to catch the handles. Power tool holders are simple boxes or platforms.
The cleated back should extend the full width of the holder and be at least 2 inches tall. This provides solid engagement with the wall strips. Shorter backs can tip forward under load.
Glue the cleated strip to the back of each holder, then reinforce with screws or brads. The joint should be bulletproof because it carries the entire load.
Holders Worth Building First
Chisel and screwdriver rack: A simple board with a front ledge and sized holes or slots for each tool. Seeing all your chisels at once changes how you select them.
Hand plane shelf: A tilted platform that presents planes sole-forward for easy grabbing. Include a small lip to prevent sliding.
Power tool platforms: Simple boxes or brackets sized for your router, sander, jigsaw. Keep the tools charged and ready at eye level.
Tape and adhesive station: Dowels or rods for tape rolls, small shelves for glue bottles, hooks for applicator brushes.
Clamp storage: Deep notches cut into a 2×6 that let you slide clamp bars in vertically. F-clamps, bar clamps, and spring clamps each need different holder designs.
Advanced Applications
Once you’ve mastered basic holders, the system expands endlessly. Build a fold-down workbench that hangs on cleats. Create modular drawer units that mount anywhere on the wall. Design a finishing supply station that moves to your finishing area when needed.
Some shops use French cleats for ceiling-mounted storage of seasonal items. The same geometry works overhead, though you’ll want safety straps for anything heavy.
Common Mistakes to Avoid
Don’t use thin plywood for the cleated strips. Material under 3/4″ thick doesn’t provide enough bevel surface for secure locking. Holders fall off unexpectedly.
Don’t skip the wall studs. Drywall anchors won’t hold the weight of loaded tool holders. Hit studs with every screw.
Don’t crowd your layout initially. Start with half as many holders as you think you need. You’ll add more over time, and starting sparse lets you discover what belongs where.
French cleats are the last wall storage system you’ll ever install. Build it right, and you’ll spend years adding holders while the wall strips never change. That’s the mark of a system designed by people who actually work in shops.
\n\n
Related Articles
\n


Stay in the loop
Get the latest the workshop journal updates delivered to your inbox.